If you’ve defined a match action, the GREP panel enables you to search through any number of files and folders using the regular expression you created. If you defined a replace action, you can use it to search-and-replace through files and folders. This way you can test your regular expression on a larger number of files (rather than just one file on the Test panel), and even perform actual search or file maintenance tasks.
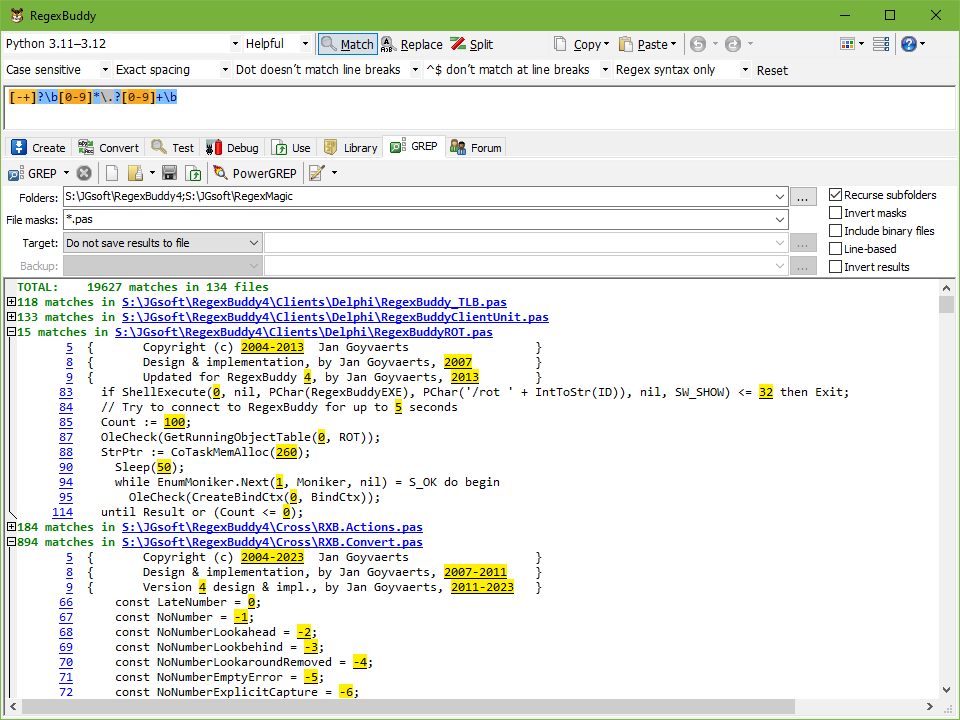
Type the folder you want to search through in the Folders field, or click the ellipsis button next to it to select the folder from a folder tree. If you want to search through multiple folders, simply enter them all delimited by semicolons or commas. To search through a folder that has a semicolon or comma in its name, enclose the entire folder with double quotes. Turn on “recurse subfolders” to make RegexBuddy search through all subfolders of the folder(s) you specified.
If you don’t want to search through all files in the folder, you can restrict the search using file masks. In a file mask, the asterisk (*) represents any number (including none) of any character, similar to .* in a regular expression. The question mark (?) represents one single character, similar . in a regular expression. E.g. the file mask *.txt tells RegexBuddy to search through any file with a .txt extension. You can delimit multiple masks with semicolons or commas. To search through all C source and header files, use *.c;*.h. To include a literal semicolon or comma in a file mask, enclose that file mask with double quotes.
File masks also support a simple character class notation, which matches one character from a list or a range of characters. E.g. to search through all web logs from September 2003, use a file mask such as www.200309[0123][0-9].log or www.200309??.log.
Sometimes it is easier to specify what you do not want to search through. To do so, mark the “invert mask” option. With this option, a file mask of *.c;*.h tells RegexBuddy to search through all files except C source and header files.
If you turn on “include binary files”, then RegexBuddy searches through all files that can be found with your folder and file mask settings. If you turn it off, then RegexBuddy checks all those files to see whether they are text files or binary files and only searches through the text files. A file is seen as binary if it contains NULL bytes within the first 64K of its contents that don’t fit the pattern of a UTF-16 or UTF-32 file.
By default, RegexBuddy searches through a whole file at once, and allows regex matches to span multiple lines. Traditional grep tools, however, search through files line by line. You can make RegexBuddy do the same by turning on the “line-based” option. When grepping line by line, you can turn on “invert results” to make RegexBuddy list all lines in each file which the regular expression does not match.
When searching, RegexBuddy does not modify any files by default. The search matches are simply displayed on screen. To save all the search matches into a single file, select the “save results into a single file” option. Click the ellipsis button to the far right of the target setting to select the file you want to save the results into. To create one file for each file searched through, select “save one file for each searched file”. Click the ellipsis button to select the folder to save the files into. Each saved file will have the same name as the file searched through.
When executing a search-and-replace, RegexBuddy can either modify the files it searched through, or create copies of those files and modify the copies. If you select to “copy only modified files” or “copy all searched files”, click the ellipsis button to select the folder to save the target files into. Again, each target file will have the same name as the original.
RegexBuddy does not prompt you when the GREP action overwrites one or more files. Therefore, you should make sure the backup option is set to anything except “no backups”. The “single .bak” and “single .~??” options create a backup file for each target file that is overwritten. If the backup file already existed, the previous backup is lost. The “multi .bak” and “multi backup N of” options create numbered backup files without overwriting existing backup files. The “same file name” option keeps one backup for each target file, and gives the backup copy the same name. The “hidden history” option creates a hidden folder named “__history” in each folder where files are overwritten which keeps backups with numbered extensions.
The “same file name” backup option requires you to specify a folder into which backup files should be stored. The other backup options except “hidden history” allow you to choose. If you specify a backup folder, all backups will be stored in that folder. If not, backups are saved in the same folders as the target files that were overwritten. Keeping backups in a separate folder makes it easy to get rid of the backups later, but makes it harder to find a backup file if you want to restore a file manually.
RegexBuddy can GREP in three modes: preview, execute and quick execute. You can access these modes through the GREP button. A preview displays detailed results in RegexBuddy, without modifying any files. Execute an action to create or modify target files as you specified, and to see detailed results afterwards to verify the results.
Use “quick execute” when you know the GREP action will do what you want, to quickly update files without displaying detailed results in RegexBuddy. The “quick execute” option can be much faster than “execute” when performing a search-and-replace through large numbers of files, since it doesn’t require RegexBuddy to keep track of each individual search match. On a typical computer, “preview” and “execute” can handle about 100,000 search matches, while “quick execute” has no practical limits.
If you followed my advice to have RegexBuddy create backup files, you can instantly undo the effects of a GREP action. Click on the GREP button, and then select Undo from the menu. This replaces all files that were overwritten with their backup copies. The backups are removed in the process. Only the very last action can be undone by RegexBuddy, and only if you do not close RegexBuddy. If you have multiple instances of RegexBuddy open, each instance can undo its own very last GREP action.
If you’ve verified the results, and all target files are in order, click the GREP button and select Delete Backup Files to delete the backup files created by the very last GREP action.
The Clear button clears the GREP action and results. It is not necessary to click the Clear button before starting a new action, but it may make things easier for you by reducing clutter.
Click the Open button to open a GREP action previously saved with the Save button. Note that only the action (regular expression with folder, mask, target and backup settings) is saved into rbg files.
To save the results of an action, click the Export button. When prompted, enter a file name with a .txt or .html extension. If you enter a .html extension, the results are saved into an HTML file. When you view the HTML file in a web browser, it will look just like the results are displayed in RegexBuddy. If you enter any other extension, the results are saved as plain text. If you want to save search results without additional information such as the number of matches, set the Target option to save the results to file before executing the action. Target files only contain search matches, one on each line.
Since RegexBuddy’s focus is on creating and testing regular expressions, it only offers basic GREP functionality. While certainly useful, you may want to invest in a powerful GREP tool such as PowerGREP. PowerGREP can search using any number of regexes at once, post-process replacement texts during search-and-replace, arbitrarily section files using an extra set of regular expressions, search through proprietary file formats such as PDF, MS Word and Excel, etc. PowerGREP also keeps a permanent undo history, a feature that can save your day all by itself.
When the GREP panel is showing search results and the cursor is on a file name or on match results that have a file header, then the Edit button (rightmost button) on the GREP toolbar provides various options to open the file. Clicking the button itself opens the file on the Test panel in RegexBuddy. Double-clicking a file name in the GREP results does the same. Double-clicking a search match opens the file on the Test panel and also selects that search match on the Test panel.
The drop-down menu of the Edit button allows you to open the file in external applications. If the file has Open and Edit file associations, then those are shown at the top of the menu. These open the file in its default application just like double-clicking in Windows Explorer does.
The first of the two EditPad items opens just the selected file in EditPad. The second EditPad item opens all files with search matches in EditPad. The Explore Folder command opens the folder that contains the selected file in Windows Explorer.
The bottommost item in the menu opens the file on the Test panel just like clicking the Edit button directly does.