It is always a good idea to test your regular expression on sample data before using it on valuable, actual data, or before adding the regex to the source code for the application you are developing. You can debug a regular expression much easier with RegexBuddy.
It is obvious that you should check that the regex matches what it should match. However, it is far more important that you verify that it does not match anything that you do not want it to match. Testing for false positives is far more important, something which people new to regular expressions often do not realize.
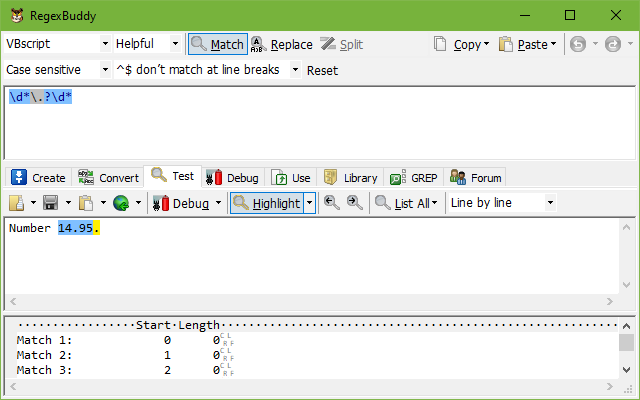
An example will make this clear. Suppose we want to grab floating point numbers in the form of 123, 123.456 and .456. At first sight, the regex \d*\.?\d* appears to do the trick.
To test this, type Number 14.95. in the edit box just below the toolbar on the Test panel. Then click the Find First button. RegexBuddy reports a zero-length match at offset 0. If you click Find Next, RegexBuddy reports a zero-length match at offset 1. Another click on Find Next gives a match at offset 2, and so on until 14.95 is matched at offset 7. To top it off, the full stop at the end of the string is the final match.
While our regular expression successfully matches the floating point numbers we want, it also matches an empty string. Everything in the regex is optional. The solution is to make the regex enforce the requirement that a floating point number must contain at least one digit. See the floating point number example for a detailed discussion of this problem.
The Test panel has two edit boxes. The top one is where you enter the subject string to test the regex on. You can simply type in some text, or click the Open File button to use a text file as the subject string. You can access recently used test files by clicking the downward pointing arrow of the Open File button.
If you copied some text to the Windows clipboard, you can use that as the test subject by clicking the Paste Subject button. Paste “as is” to paste the text on the clipboard unchanged. If you copied a string literal from your source code, including the single or double quotes delimiting it, select one of the programming language string options when pasting. Select C-style for C++, Java, C#, etc., Pascal-style for Delphi, Basic-style for VB, etc.
If you get question marks instead of characters when you try to type or paste in some text, or if a file you’ve just opened displays with the wrong characters, RegexBuddy is using the wrong encoding for your text. To fix this, right-click on the text subject and select Encoding in the context menu. Pick the “reinterpret” option and select the correct encoding. This fixes incorrect characters in a file you’ve opened. Question marks that you typed or pasted in are not fixed automatically. Delete the question marks and type or paste the text again.
When working with binary data, right-click on the test subject and select Hexadecimal in the context menu to switch to hexadecimal mode.
RegexBuddy provides only one big edit control for entering your test subject. By default, the “whole file” scope is selected in the toolbar. RegexBuddy then treats the test subject text as one long string, possibly consisting of multiple lines. The effect is the same as if you loaded the whole file into a single variable in a programming language, and then passed that variable as the test subject to the function or class that does regex matching. Depending on your regular expression, regex matches may span across lines.
If you select the “line by line” scope, RegexBuddy treats each line in the edit control as a separate subject string. This gives you the same results as when you read a file line by line in a loop in a programming language, and do the regex match separately on each line inside the loop. Regex matches can never span across lines. The regex engine never sees more than one line at a time. RegexBuddy also won’t include the line break at the end of each line in the test subject. The “line by line” scope is a handy way of entering multiple test subjects if you know that your actual subject strings in your actual application never have line break characters in them.
The “page by page” scope doesn’t have an everyday programming analog. RegexBuddy provides this option to make it straightforward to specify multiple test subjects that each can consist of multiple lines. Press Ctrl+Enter in the edit control to insert a page break. The page break appears as a horizontal line in RegexBuddy. If you save the file, RegexBuddy saves a form feed ASCII character (\f or \x0C) at each page break position. If you were to enter page breaks with the “whole file” scope selected, RegexBuddy’s regex engine would also see the form feed characters when you test your regular expression. With the “page by page” scope selected, RegexBuddy treats the page breaks as hard delimiters that the regex engine can’t see. The regex engine is fed each block of text, page by page.
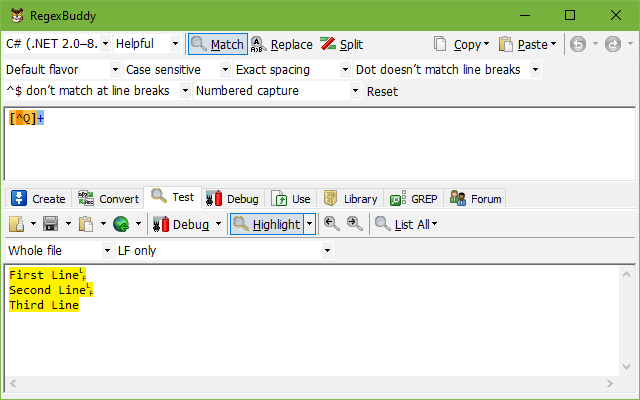
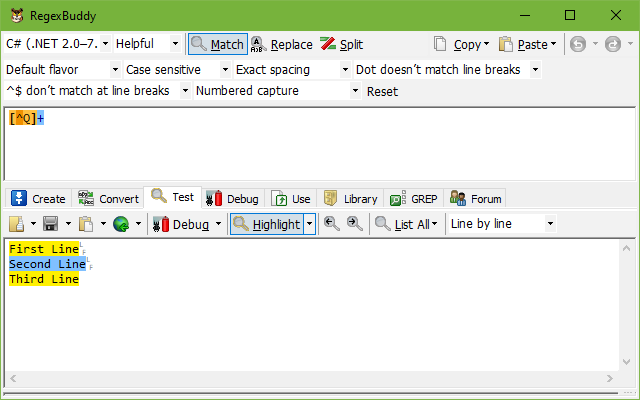
Changing the test scope does not change how your regular expression works. It can change the resulting matches, however, because it does change the test subject your regex is applied to. If your test subject is three lines of text that don’t include the character Q, for example, then the regex [^Q]+ finds one match that spans the entire scope. With the scope set to “whole file”, there is only one test subject with three lines. RegexBuddy finds one match spanning all three lines. With “line by line” selected, there are three totally separate test subjects, each consisting of a single line. RegexBuddy then finds three matches, one for each test subject, each matching the whole line each test subject consists of. The above two screen shots show the effect.
Windows text files normally use CRLF or \r\n line breaks. Linux and OS X use UNIX-style LF only or \n line breaks. Classic Mac used CR only or \r for line breaks. All editor controls in RegexBuddy handle all these line break styles, as well as all other Unicode line breaks even though they are not commonly used in plain text files.
Most regular expression engines are not so smart, however. Many recognize only \n as a line break character. This mainly affects how the dot and anchors behave.
In many cases, you’ll never notice this. For example, the regex engines in Perl, Python, and Ruby only recognize \n as a line break. Yet, when you read a Windows text file in its entirety into a variable in any of these languages, a regex like ^.*$ seems to work just fine. The reason is that these languages open files in “text mode” by default. In this mode, when your script runs on Windows, reading from a file automatically converts CRLF line breaks into LF only, and writing to a file automatically does the opposite conversion.
If you set the test scope to “line by line”, then you don’t need to worry about this. Then the regular expression never sees any line breaks and RegexBuddy won’t show its line break handling option on the Test toolbar.
If you set the test scope to “whole file” or “page by page”, then right after that, you can choose how RegexBuddy deals with line breaks. The default is “automatic line breaks”, which converts line breaks to fit the regex engine of the selected application whenever you open a file or select another application. The parentheses after “automatic line breaks” indicate what the option does for the current application. For Perl, it will say (LF only) which means all CR and CRLF line breaks will be converted into LF only. For EditPad, it will say (no change) because EditPad’s regex engine intelligently handles all line breaks, so no conversion is needed.
You can also select CRLF pair, LF only, or CR only to convert the active file to a particular line break style. Doing this disables the automatic line break conversion. The conversion is only applied once. If you open another file that uses a different line break style, the drop-down list will change to indicate that file’s line break style. The file won’t be converted unless you gain choose the line break style you want from the drop-down list. To re-enable automatic conversion, simply select that option again.
Some files that you open may use a mixture of different line break styles. If automatic conversion is off or requires no change, then RegexBuddy preserves the mixed line breaks. The line break style drop-down list will then have an additional option saying “mixed” along with the file’s primary (most common) line break style. RegexBuddy uses the primary line break style for line breaks that you enter via the keyboard or paste from the clipboard. Selecting the “mixed” option in the drop-down list disables automatic line break conversion without converting the file to a particular line break style.
Line break conversion is permanent. With automatic line break conversion enabled and Perl as the active application, opening a Windows text file converts all the line breaks to LF only. If you then select EditPad as the application, the line breaks will remain as LF only, even tough EditPad could handle all the file’s original line breaks. When an application requires “no change” to the line breaks, RegexBuddy really does nothing to the line breaks. To revert to the file’s original line break style, you’ll need to reload it.
In most situations, “automatic line breaks” is the only option you need, as most regex engines handle line breaks in a way that is consistent with what the overall environment does. One major exception among the applications supported by RegexBuddy are the applications and programming languages based on the .NET framework. Since .NET is a Windows development library, you’ll most likely be reading text files with Windows line breaks. The .NET classes for reading files do not do any line break conversion. But the .NET Regex class treats only the line feed character \n as a line break. This means that if you have a string that contains \r\n line breaks, then the regex ^.*$ includes \r at the end of each match. The regex z$ will not find any matches. It cannot match z at the end of each line because the dollar will not match between z and \r.
Because the .NET Regex class only supports line feeds, and because RegexBuddy emulates only regex engines, not complete programming languages, the “automatic line breaks” option in RegexBuddy uses “LF only” for .NET. To match up the behavior between RegexBuddy and your .NET application, you’ll either need to select “CRLF only” in RegexBuddy to disable the line break conversion, or you’ll need to do the same conversion in your .NET application by replacing all matches of the literal string "\r" with nothing.
If your regex doesn’t need to find matches that span multiple lines, then a less confusing solution may be to make your .NET application read files one line at a time, and pass each line separately to the regex. You can make RegexBuddy do the same by selecting “line by line” as the test scope. This way your subject strings will never contain any line breaks, so you don’t need to worry how your regex deals with them.
Click the Highlight button to highlight all regex matches in the test subject. The highlight feature makes it very easy to spot which text your regex matches. The highlighting is updated nearly instantly whenever you edit the regular expression or the test subject. If you’re already quite experienced at creating regular expressions, typing in your regular expression with the Test panel visible and highlighting active is a very powerful, quick and hands-on approach to creating regular expressions.
The matches are highlighted with alternating colors. That makes it easier to differentiate between adjacent matches. If you put capturing groups into the regex, you can highlight the part of each match captured into a particular backreference. That way you can test whether you have the right number for the backreference, and whether it properly captures what you want to extract from each match. Click on the downward pointing arrow on the Highlight button to select the number of the backreference to highlight. The overall matches are still highlighted. The highlighting for the backreference alternates between two colors, along with the overall match. You can change the colors in the preferences.
When matches are highlighted, click the Previous button to jump to the match before the current position of the text cursor. Click the Next button to jump to the first match after the cursor. The Find First and Find Next buttons are not available when matches are being highlighted. To get more information about a particular match, double-click it. The bottommost text box shows the offset and the length of the overall match and all capturing groups. The number of matches is also indicated.
Note that some regular expressions, like the floating point example above, can result in zero-width matches. These matches won’t be visualized by the highlighting, since they have no characters to highlight. If you double-click on a highlighted match, however, then the “match number of total” label counts those zero-width matches too. Double-clicking on the highlighted 14.95 in the screen shot at the top, for example, would say “match 8 of 10”, as there are 7 zero-width matches before it.
Match highlighting is done in a background thread. It is updated with each keystroke as you edit the test subject or regular expression. With long test subjects or complex regular expressions, the highlighting temporarily disappears while RegexBuddy applies it in the background. You don’t have to wait for it to appear in order to continue editing.
When matches are not being highlighted, the Find First button applies the regular expression once to the entire subject string. The matched part of the string is selected in the edit box, and the text cursor is moved to the end of the match. Details about the overall match, and details about each capturing group, are shown in the text box at the bottom. If the regular expression cannot match the subject string at all, the bottommost text box will tell you so.
The Find Next button works just like the Find First button, except that it applies the regex only to the part of the subject string after (i.e. to the right and below) the text cursor’s position in the subject edit box. If you do not move the text cursor yourself between clicking on the Find First and/or Find Next buttons, the effect is that Find Next continues after the previous match. This is just like a regular expression engine would do when you call its “find next” function without resetting the starting position, which is also what the Highlight and List All buttons do.
If you want to test the match from a particular starting position, just click at that position to move the text cursor there. Then click Find Next. This can lead to different match results than indicated by the Highlight and List All buttons.
When defining a match action, the List All button will be visible. When you click this button, three options to list all matches will appear. When you select one of them, RegexBuddy will perform the search through the entire subject string. The list of matches is shown in the text box at the bottom. Double-click a highlighted match in the list of matches to select it in the subject text.
If you select “List all regex matches”, then the matches are shown one after the other on separate lines. No other information is shown. If you select “List all matches in columns”, the matches will also shown one after the other on separate lines. In addition, the text matched by all of the capturing groups will be listed in columns next to the overall matches. “List all matches with full details” list all matches with all capturing groups, if any, below each match. The capturing groups will be folded with the match. To see them, click the + button in the left margin to expand the match. Two columns, Start and Length, indicate the zero-based character offset of the start of the match (i.e. the number of characters before the match), and the length of the match (i.e. the number of characters in the match).
If your regular expression has capturing groups, there will be additional items “List all matches of group X” at the bottom of the List All menu. These items list matches one after the other on a line just like “List all regex matches”, except that they’ll show the text matched by a particular capturing group rather than the overall regex matches.
The option to show non-participating groups determines how RegexBuddy displays capturing groups that did not participate in the match attempt at all. E.g. when a(b)? matches a, the optional capturing does not participate at all, because there’s no b to match. However, in the regex a(b?), the group will always participate because it’s not optional. It’s contents are optional, so when the regex matches a, the group will participate without capturing anything. When showing non-participating groups, RegexBuddy will display “n/a” in the results for the group in the former regex, and nothing for the group in the latter regex. If you turn off this option, RegexBuddy will show nothing for either group, as neither captured anything. In some programming languages, non-participating groups are set to NULL, while participating groups without a match are set to the empty string. For these languages, it can be important to have RegexBuddy make the distinction. However, if you plan to save or copy and paste the test results, the “n/a” strings may get in the way. Then you should turn this option off.
When defining a replace action, the Replace All button will be visible. When you click this button, two menu items will appear. If you choose “Search-and-replace all matches”, RegexBuddy will perform the search-and-replace across the entire subject string. The result is shown in the text box at the bottom. Replacements will be highlighted in the result. Double-click a replacement to select the text that was replaced in the test subject.
If you select “List all replacements”, then RegexBuddy will search through the entire subject string. For each match, RegexBuddy substitutes backreferences in the replacement text. The replacements will be listed one after the other on separate lines. Essentially, what you get is the result of a search-and-replace with all the text that wasn’t matched by the regular expression removed from the results. Instead there will be a line break between each match.
When defining a split action, the Split button is visible instead. Click it to make RegexBuddy split the subject string, and show the resulting list of strings in the edit box at the bottom. The strings in the list are separated by horizontal lines. If the subject string consisted of multiple lines, it is possible that some of the strings in the resulting list span more than one line.
At the bottom of the List All and Replace All menus, there’s an option to make the results update automatically when you change the regex or test subject. Turning this on has the same effect as selecting the same List All, Replace All or Split command after each keystroke.
Turning on this option will allow you to see the effects of your changes as soon as RegexBuddy can calculate them. The List All, Replace All and Split commands run in a background thread. They won’t slow you down while you edit your regular expression or test subject.
Click the Debug button to invoke the RegexBuddy debugger at the position of the text cursor in the test subject. RegexBuddy will automatically switch to the Debug panel to give you a fully detailed analysis of how your regular expression matches or doesn’t match your test subject.