Set Regular Expression Options
A mistake many people new to regular expressions make is to take any regex at face value. A regular expression is meaningless in isolation. It will be interpreted by a particular application or programming library. Different tools interpret regular expressions differently. Sometimes the differences are subtle. Sometimes various tools use completely different syntax.
On top of that, most regex engines support various matching modes or options, such as case sensitivity. A regular expression written with the “case insensitive” option in mind will miss most of the intended matches if you forget to turn on that option when you implement the regular expression.
Fortunately, RegexBuddy makes things easy for you. When using RegexBuddy’s library of regular expressions, click the Use button rather than copying and pasting the regex, and RegexBuddy will move over the application and mode selections along with the regex. When converting a regex from one application to another, RegexBuddy takes any differences in supported matching modes into account, and adjusts the regex or warns as needed.
When you implement your regular expression on the Use panel, RegexBuddy will automatically set the same matching options in the source code snippets. If you copy and paste the regular expression manually into your source code, the matching options will not be copied over automatically, since they’re not part of the regular expression itself. Make sure to set the options in your own source code.
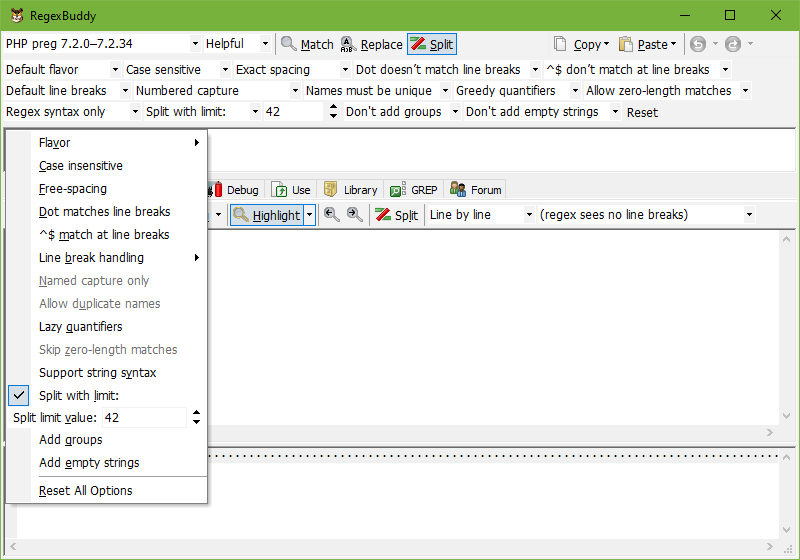
You can set the regular expression options by selecting different values the drop-down lists on the toolbar above the regular expression in RegexBuddy. The value shown in each drop-down list is the present state of that option. You can also toggle the options by pressing Alt+O on the keyboard and then pressing the underlined letter of the option you want to toggle as it appears in the popup menu. The popup menu uses check marks to indicate which options are on.
By default, RegexBuddy only shows the options that the selected application actually allows you to change. On the Operation tab in the Preferences you can choose to always show all the options that RegexBuddy supports. The above screen shot illustrates this. The options that the active application doesn’t support have only one item in the drop-down list, so you can see the state of the option, but not change it. In the Alt+O popup menu, options that can’t be changed are grayed out. The options for splitting strings are never shown in Match or Replace mode, even when you turned on the preference to show all options.
- Flavor
- Default flavor: Use the application’s default regex syntax and matching behavior. For most applications this is the only choice.
- ECMAScript: For std::regex this selects the ECMAScript grammar, which is the default and the most feature-rich. It is somewhat similar to JavaScript’s regex syntax. For .NET, this turns on RegexOptions.ECMAScript, which changes the behavior of a few regex tokens to more closely match that of JavaScript. Do not confuse selecting ECMAScript as an option for std::regex or .NET with selecting actual ECMAScript as your application. To work with the actual ECMAScript regex flavor, select JavaScript as your application.
- Basic: Select the basic grammar for std::regex.
- Extended: Select the extended grammar for std::regex.
- Grep: Select the grep grammar for std::regex.
- EGrep: Select the egrep grammar for std::regex.
- Awk: Select the awk grammar for std::regex.
- Case sensitivity
- Case insensitive: Differences between uppercase and lowercase characters are ignored. cat matches CAT, Cat, or cAt or any other capitalization in addition to cat.
- Case sensitive: Differences between uppercase and lowercase characters are significant. cat matches only cat.
- Free-spacing mode
- Free-spacing: Unescaped literal spaces and line breaks in the regex that are not inside a character class are ignored so you can use them to format your regex to make it more readable. In most applications this mode also makes # the start of a comment that runs until the end of the line. Unescaped literal whitespace inside character classes does still add that whitespace to the character class.
- Free-spacing […]: Free-spacing mode that also ignores whitespace inside character classes. Only a few regex flavors support this.
- Exact spacing: Unescaped spaces, line breaks, and # characters in the regex are treated as literal characters that the regex must match.
- Single-line mode
- Dot matches line breaks: The dot matches absolutely any character, whether it is a line break character or not. Sometimes this option is called “single line mode”.
- Dot doesn’t match line breaks: The dot matches any character that is not a line break character. Which characters are line break characters depends on the application and the line break mode.
- Multi-line mode
- ^$ match at line breaks: The ^ and $ anchors match after and before line breaks, or at the start and the end of each line in the subject string. Which characters are line break characters depends on the application and the line break mode. Sometimes this option is called “multi-line mode”.
- ^$ don’t match at line breaks: The ^ and $ anchors only match at the start and the end of the whole subject string. Depending on the application, $ may still match before a line break at the very end of the string.
- ^$ match at line breaks; dot doesn’t match line breaks: Some applications allow these two options only to be set in combination.
- ^$ don’t match at line breaks; dot matches line breaks: Some applications allow these two options only to be set in combination.
- Line break handling
- Default line breaks: The dot and anchors use the application’s default interpretation for line breaks.
- LF only: The dot and anchors recognize only the line feed character \n as a line break.
- CR only: The dot and anchors recognize only the carriage return character \r as a line break.
- CRLF pairs only: The dot and anchors recognize only the line feed and carriage return characters when they appear as a pair as a line break.
- CR, LF, or CRLF: The dot and anchors recognize the line feed and carriage return characters as line breaks, whether they appear alone or as a pair.
- Unicode line breaks: The dot and anchors recognize all Unicode line breaks. This includes the line feed and carriage return characters as line breaks, whether they appear alone or as a pair, as well as the vertical tab \v, the form feed \f, next line \u0085, line separator \u2028, and paragraph separator \u2029 characters.
- Explicit capture
- Duplicate names
- Allow duplicate names: Multiple named capturing groups in the regular expression are allowed to have the same name. How backreferences to shared names are treated depends on the application.
- Names must be unique: All named capturing groups in the regular expression must have a unique name. Groups with the same name are treated as an error.
- Lazy quantifiers
- Lazy quantifiers: Quantifiers are lazy by default. Adding a question mark makes them greedy. So a* is lazy and a*? is greedy.
- Greedy quantifiers: Quantifiers are greedy by default. If the application supports lazy quantifiers, then adding a question mark makes quantifiers lazy. So a* is greedy and a*?, if supported, is lazy.
- Zero-length matches
- Skip zero-length matches: Skip any zero-length matches found by the regular expression. \d* will only match sequences of digits. Some applications skip matches by backtracking, so \d*|a matches all sequences of digits and all letters a. Other applications skip matches by advancing through the string, so \d*|a matches all sequences of digits but never matches a because it is skipped over when the first alternative finds a zero-length match.
- Allow zero-length matches: Treat zero-length matches as normal matches. \d* will match sequences of digits and will also find a zero-length at each position in the string that is not followed by a digit.
- String syntax
- Support string syntax: Make RegexBuddy recognize syntax that is supported by string literals in a programming language as if it were part of the regular expression or replacement syntax. Select this option if you plan to use your regex and/or replacement text as a literal string in source code. For example, with Python 3.2 and earlier, RegexBuddy will recognize \uFFFF in this mode, because Python recognizes such escapes in literal strings.
- Regex syntax only: Tell RegexBuddy not to recognize any syntax other than what the regular expression engine itself supports. Select this option if you plan to provide the regex and/or replacement text as user input to the application. For example, with Python 3.2 and earlier, RegexBuddy will treat \uFFFF as an error in this mode, because the regex engine in Python 3.2 and earlier does not recognize this escape.
- Split limit
- Split without limit: Split the string as many times as possible.
- Split with limit:: Limit the number of times the string is split. Some applications take this number as the maximum number of regex matches to split on, while other applications take this number as the maximum number of strings in the returned array. Some applications add the unsplit remainder of the string to the array, while others don’t. A zero or negative limit makes some applications split the string as many times as possible, while others will not split the string at all. A zero or negative limit also makes some applications discard empty strings from the end of the returned array.
- Split capture
- Add groups: When splitting a string, add text matched by capturing groups to the array. Some applications add all groups, while others add only the first or the last group.
- Don’t add groups: When splitting a string, do nothing with text matched by capturing groups.
- Split empty
- Add empty strings: When splitting a string, regex matches that are adjacent to each other or the start or end of the string and capturing groups that find zero-length matches (when adding groups) cause empty strings to be added to the array. Some applications may not add empty strings to the array in certain situations even when this option is set, sometimes depending on whether and which limit you specified
- Don’t add empty strings: When splitting a string, never add any empty strings to the returned array.
Default Options
The drop-down lists use positive labels to indicate all states. The case sensitivity or insensitivity option, for example, is always indicated as “case sensitive” and “case insensitive”. This avoids confusing double negations like “case insensitive off”. It also avoids confusion when switching between applications where one is case sensitive by default with an option to make it case insensitive, and the other is case insensitive by default and has an option to make it case sensitive.
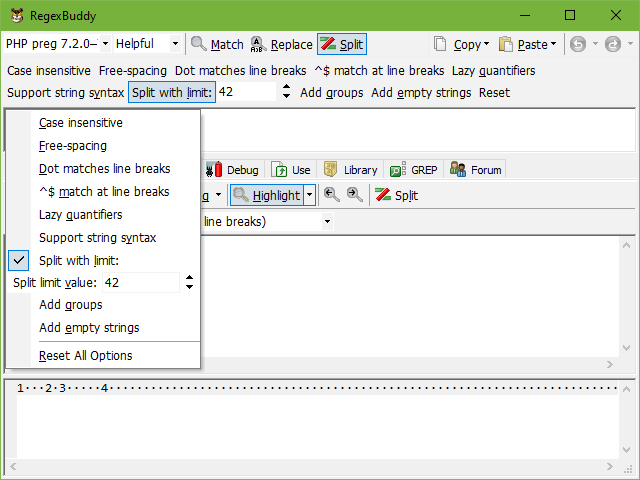
But if the potential confusion of toggle buttons does not bother you, you choose to “show options that can be changed with toggle buttons that indicate the “on“ state” on the Operation tab in the Preferences. The above screen shot shows this. The benefit is that the buttons need only one click to toggle an option while drop-down lists require two. The actual application you will use the regex with likely also has toggle buttons or checkboxes rather than drop-down lists. But if you switch between applications in RegexBuddy, you will need to take into account that the meaning of the buttons may invert. If an application is case sensitive by default, the button will say “case insensitive”. If you then switch to an application that is case insensitive by default, the button will change its label to “case sensitive” and will toggle its state (depressed or not). By changing their labels the buttons ensure that the application’s default options are being used when all buttons are off (not depressed).
Regardless of whether options are shown with drop-down lists or toggle buttons, you can click the Reset button or select Reset All Options in the popup menu to change all options to the defaults for the current application.