Click the Preferences button to adjust RegexBuddy to your tastes and habits. It’s the second button from the right on the topmost toolbar in RegexBuddy’s main window.
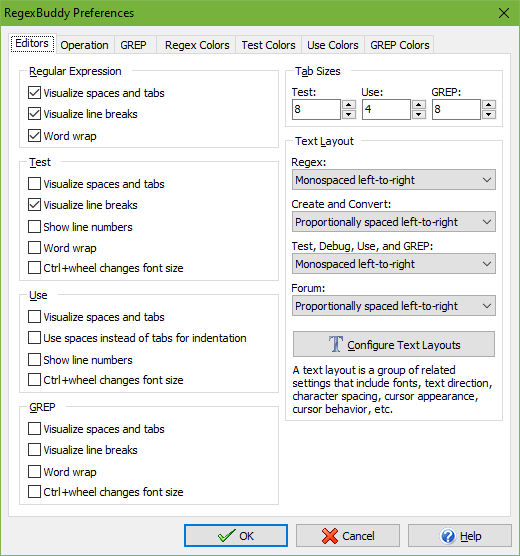
Regular Expression: Configures the edit boxes for entering the regular expression and the replacement text. You can choose whether spaces and tabs should be indicated by small dots and » signs, and whether line breaks should be indicated by line break symbols.
Test: Configures the edit boxes on the Test panel. You can choose whether spaces and tabs should be indicated by small dots and » signs, and whether line breaks should be indicated by line break symbols. You can also specify if line numbers should be shown in the left margin, and whether long lines should wrap at the edge of the edit box instead of requiring horizontal scrolling.
Use: Configures the edit boxes on the Use panel. You can choose whether spaces and tabs should be indicated by small dots and » signs, whether the tab key should insert spaces or tabs, and whether line numbers should be shown in the left margin.
GREP: Configures the results display on the GREP panel. You can choose whether spaces and tabs should be indicated by small dots and » signs, and whether line breaks should be indicated by line break symbols. You can also specify whether long lines should wrap at the edge of the edit box instead of requiring horizontal scrolling.
Tab Sizes: Specify the width in spaces of tabs in the edit boxes on the Test, Use, and GREP panels.
Text Layout: In RegexBuddy, a “text layout” is a combination of settings that control how text is displayed and how the text cursor navigates through that text. The settings include the font, text direction, text cursor behavior, text cursor appearance, which characters are word characters, and how the text should be spaced. You can select up to four different text layouts that are used for various parts of RegexBuddy. The Regex text layout is used for edit boxes for regular expressions and replacement texts. The Convert text layout is used for the warning and error messages on the Convert panel. The font from the Convert text layout is also used for the regex tree on the Create panel. The editors on the Test, Debug, Use, and GREP panels all use the same text layout. You’ll likely want to select a monospaced text layout for this one, so that columns line up correctly. The Forum text layout is used to edit messages on the built-in user forum.
You can select predefined text layouts from the drop-down lists. Or, you can click the Configure Text Layouts button to show the Text Layout Configuration window to customize the text layouts.
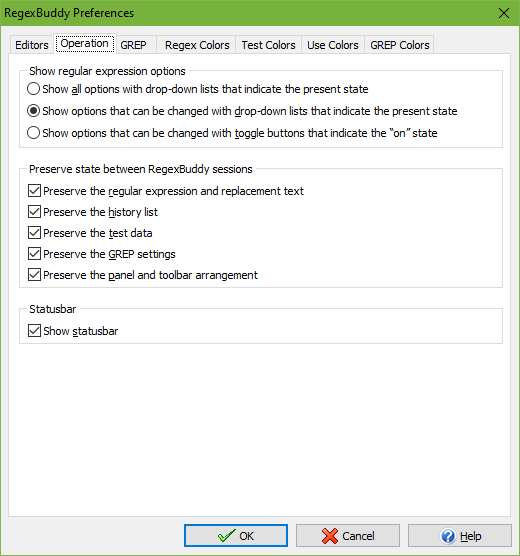
Regex options: RegexBuddy’s main window has a toolbar with a series of drop-down lists or toggle buttons above the regular expression. You can use these to set various regex modes or regex options. This toolbar can be configured in three ways. The default is “show options that can be changed with drop-down lists that indicate the present state”. RegexBuddy then only shows the drop-down lists for the options that the active application allows to be changed. Depending on how many options an application supports, this can significantly reduce the amount of screen space needed for the drop-down lists. It also makes sure you don’t get confused by options that don’t apply to your application.
But if you regularly switch between applications that support different options, you may find it distracting that the drop-down lists move around each time you switch. Then you can choose “show all options with drop-down lists that indicate the present state” to always keep all the drop-down lists visible. If your application doesn’t allow a certain option to be changed, the drop-down list for that option will have the application’s default behavior as its only choice.
The drop-down lists use positive labels to indicate all states. The case sensitivity or insensitivity option, for example, is always indicated as “case sensitive” and “case insensitive”. This avoids confusing double negations like “case insensitive off”. It also avoids confusion when switching between applications where one is case sensitive by default with an option to make it case insensitive, and the other is case insensitive by default and has an option to make it case sensitive.
But if the potential confusion of toggle buttons does not bother you, you can choose to “show options that can be changed with toggle buttons that indicate the “on“ state”. The benefit is that the buttons need only one click to toggle an option while drop-down lists require two. The actual application you will use the regex with likely also has toggle buttons or checkboxes rather than drop-down lists. But if you switch between applications in RegexBuddy, you will need to take into account that the meaning of the buttons may invert. If an application is case sensitive by default, the button will say “case insensitive”. If you then switch to an application that is case insensitive by default, the button will change its label to “case sensitive” and will toggle its state (depressed or not). By changing their labels the buttons ensure that the application’s default options are being used when all buttons are off (not depressed).
Preserve state between RegexBuddy sessions: With these checkboxes you can choose what RegexBuddy should remember when you close it and restart it. Turning these on allows you to continue working where you left off. Turning these off allows you to instantly start with a clean slate.
Show statusbar: The statusbar displays helpful hints as you move the mouse over different parts of RegexBuddy’s window, most importantly the toolbar buttons. Leave this option on as you familiarize yourself with RegexBuddy. Later, you can turn it off to save space on the screen.
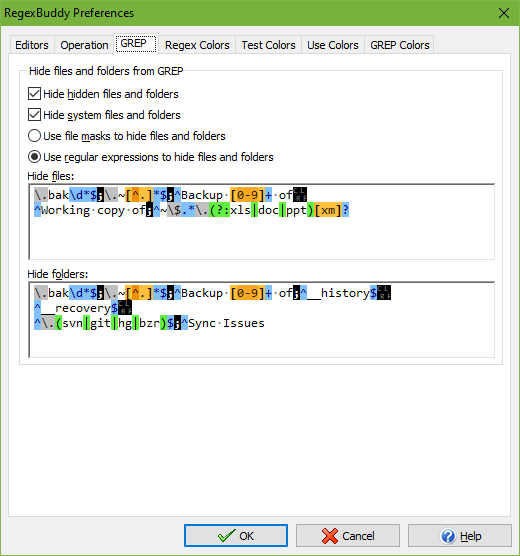
The options “hide hidden files and folders” and “hide system files and folders” are turned on by default. These make all files and folders that have the hidden or system attribute set invisible to the GREP panel. Turn these options off if you want to grep through hidden and system files and folders.
Choose “use file masks to hide files and folders” to use traditional wildcard file masks to hide files and folders from the GREP panel. Choose “use regular expressions to hide files and folders” to use regular expressions to hide files and folders. Wildcards have to match the entire name of the file or folder to hide it. Regular expressions hide any file or folder with a name matched by the regex, even if the name is only matched partially. The regular expression “joe”, for example, hides all files that contain “joe” anywhere in the file name. The equivalent file mask using wildcards is “*joe*”. When using wildcards, “joe” hides files exactly named “joe” only.
In the “hide files” box you can enter a semicolon-delimited list of file masks or regular expressions. All files of which the names match one of these file masks are automatically skipped by the GREP panel. By default, the permanent exclusion masks are set to a regular expression that matches all backup files created by RegexBuddy, as well as temporary working copies of files created by EditPad Pro and MS Office. If you’d ever need to search through backup files or working copies, you will need to adjust the permanent exclusion file masks first.
The “hide folders” box works in the same way, except that the file masks you specify are tested against individual folder names. If the name of a folder matches one of these file masks then the GREP panel automatically skips that folder and any files or folders inside that folder. The default settings exclude __history, which is the folder name that RegexBuddy uses for backup files when you select the “hidden history” backup option. Also excluded by default is .svn which is the folder name that Subversion uses to cache data in each folder that you have added to version control.
Configure the colors used to highlight different parts of regular expressions and replacement texts. You can select one of the preset configurations at the top of the screen. To customize the colors, click on an item in the list of individual colors. Then click the Background Color and Text Color buttons to change the item’s colors. You can also change the font style with the bold, italic and underline checkboxes. At the bottom, a sample edit box will show what the color configuration looks like. You can edit the text in the example box to further test the colors.
Configure the colors used by the Highlight button on the Test panel. You can select one of the preset configurations at the top of the screen. To customize the colors, click on an item in the list of individual colors. Then click the Background Color and Text Color buttons to change the item’s colors. You can also change the font style with the bold, italic and underline checkboxes. At the bottom, a sample edit box will show what the color configuration looks like. You can edit the text in the example box to further test the colors. The regex match(?:.*?(with capturing group))? is used to highlight the sample text.
Configure the colors used by syntax coloring of the code snippets on the Use panel. You can select one of the preset configurations at the top of the screen. To customize the colors, click on an item in the list of individual colors. Then click the Background Color and Text Color buttons to change the item’s colors. You can also change the font style with the bold, italic and underline checkboxes. At the bottom, a sample edit box will show what the color configuration looks like. You can see the effect for several different programming languages. You can edit the text in the example box to further test the colors.
Configure the colors used by the results display on the GREP panel. You can select one of the preset configurations at the top of the screen. To customize the colors, click on an item in the list of individual colors. Then click the Background Color and Text Color buttons to change the item’s colors. You can also change the font style with the bold, italic and underline checkboxes. At the bottom, a sample results display will show what the color configuration looks like.