RegexBuddy’s regular expression debugger provides a unique view inside a regular expression engine. To invoke the debugger, switch to the Test panel. Place the text cursor in the test subject at the position you want to debug the regex match attempt. Then click the Debug button. If regex matches are highlighted in the test subject, placing the cursor in the middle of a highlighted match debugs the match attempt that yielded the match.
When you click the Debug button directly, RegexBuddy only debugs one match attempt. This is the attempt that starts at the position of the text cursor in the test subject at the time you clicked the Debug button. However, if the text cursor was in the middle of a highlighted match, the debugger starts at the beginning of the match rather than in the middle of the match.
If you want to debug all match attempts throughout the test subject, use the downward pointing arrow next to the Debug button and select “Debug everywhere”. To make sure it doesn’t run out of memory, the debugger stops after one million steps. If your regular expression is complex or your test subject very long, this may not be enough to step through it all. In that case, place the cursor at the position where the debugger gave up. Click the downward arrow next to the Debug button and invoke “Debug till end”. This makes the debugger start at the position of the text cursor, just like “Debug here”. However, at the end of the match attempt, the debugger advances through the test subject like “Debug everywhere”.
When debugging more than one match attempt, RegexBuddy collapses all match attempts. To expand a match attempt, click on the + symbol in the left margin or press the plus key on the keyboard. To collapse it again, click the - symbol or press the minus key. Press Ctrl+Up and Ctrl+Down on the keyboard to jump from one match attempt to the next.
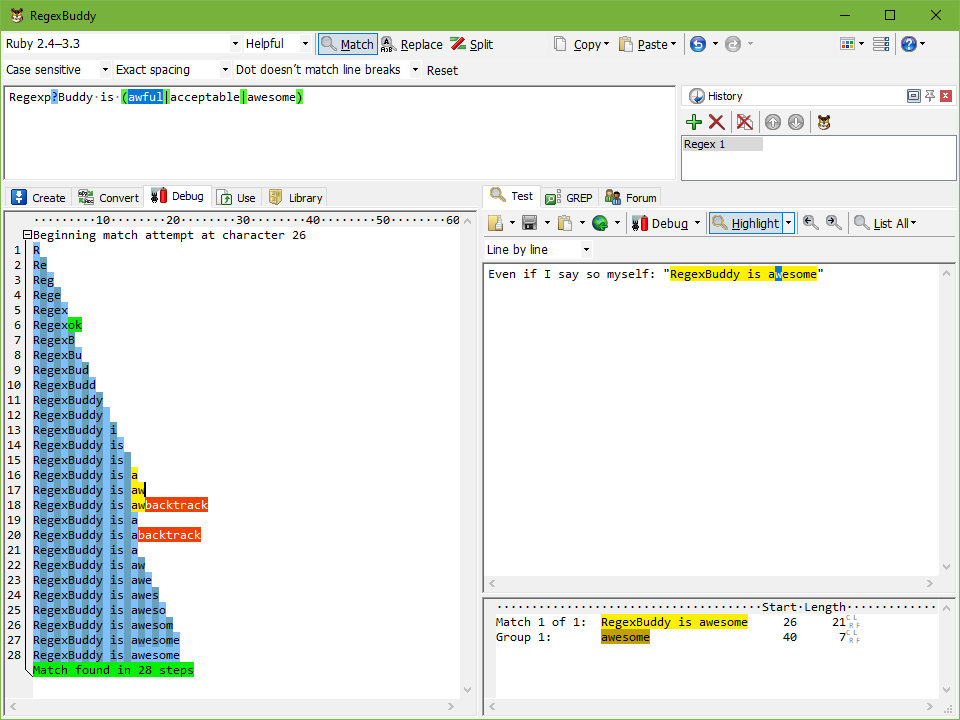
After you click the Debug button, the Debug panel displays each step in the match attempt. Each step is the result of one of two possible events. Either a token was successfully matched. The step indicates the text matched so far by the overall regular expression, including the match added by the last token. The engine then continues with the next token. In the screen shot, this is what happens at steps 1 through 5, 7 to 17, and 21 to 28.
The other event is a token that failed to match. The engine then backtracks to a previous position in the regex. The step indicates the text matched thus far, followed by “backtrack” highlighted in red which indicates the token that fails to match. So steps with “backtrack” indicate that the regex engine is going to backtrack. The next step shows where the engine ended up after backtracking.
In the screen shot, the regex engine backtracked twice. In step 18, the f in awful in the regex failed to match the e in awesome in the subject. In step 20, the first c in acceptable failed to match the w in awesome.
Backtracking means to go back in the regular expression to a position where the regex engine has remembered an alternative path. It does not necessarily mean going back in the text being matched. Such alternative paths exist wherever your regex uses alternation or quantifiers. In case of alternation, backtracking simply tries the next alternative. In case of greedy quantifiers, backtracking makes the quantifier give up one of its iterations. In case of lazy quantifiers, backtracking requires the quantifier to match another iteration. If the next alternative fails too, or if the quantifier can’t give up or expand its match, the engine keeps backtracking until it finds an alternative path that leads to a match, or until there are no alternative paths left to try, failing the match attempt.
Sometimes, a token can match successfully without matching any text. These are called zero-length matches. Since the debugger doesn’t have any text to display for such matches, it shows “ok” highlighted in green. In the screen shot, step 6 indicates that p? matched successfully. There’s no p in the test subject, but since it’s optional, we still have a successful match where the p is repeated zero times.
To see which text was matched by a particular token at each step, click on the token in the regular expression. If the token consists of a single character, place the text cursor to the right of the token. Alternatively, you can click on the token in the regex tree on the Create panel. This both selects the token in the regular expression and highlights it in the debugger. You can arrange tabs side by side by dragging and dropping them with the mouse.
The text matched by the selected regex token is highlighted in yellow in the debugger’s output. You can change the colors in the preferences. If the token is inside a group, its matches are only highlighted in the steps where the regex engine is processing the tokens inside the group. When the regex engine leaves the group, the text matched by the tokens inside the group is considered to have been matched by the group rather than the tokens inside it. If you place the text cursor after the closing round bracket of a group, the situation is reversed. This way you can see the dynamics between the tokens in the group, and the group itself.
To find out which regex token matches a particular piece of text or character, simply click on that text in the debugging output. The token then becomes selected in the regular expression. This also causes all the text matched by that token to be highlighted in yellow. If you then switch to the Create panel, the token’s regex block in the regex tree are also selected. The text you clicked on also becomes selected on the Test panel, so you can easily check its context.
In the screen shot above, I placed the cursor in the debug output at the end of step 17. RegexBuddy automatically highlighted “awful” in the regular expression. This is the regex token that matched “aw” in step 17. RegexBuddy also highlighted the “w” on the Test pane that corresponds with the “w” that’s highlighted in yellow on the Debug pane.
The good news is that RegexBuddy’s regular expression debugger is an extension of a real regular expression engine. You get exactly the same (final) results on the Debug panel as you do on the Test panel. This also means that the debugger takes into account all the quirks of the regular expression flavor you’re working with.
However, to make it easier to follow the debugger’s output, the optimizations that the regex engine makes are disabled in the debugger. This is done to maintain a one-on-one relationship between the matching process and the regular expression you typed in. These optimizations do not change the final result, but often reduce the number of steps the engine needs to achieve the result.
For example, like most other regex engines, RegexBuddy’s regex engine optimizes the regular expression (?:abcd|abef) into ab(?:cd|ef). The leading ab is then further optimized into a fast literal text search. This reduces the amount of needless backtracking quite a bit, while keeping the final result the same.