RegexBuddy takes away all the obscurity and confusion caused by the rather cryptic regular expression syntax when you click on the Create panel.
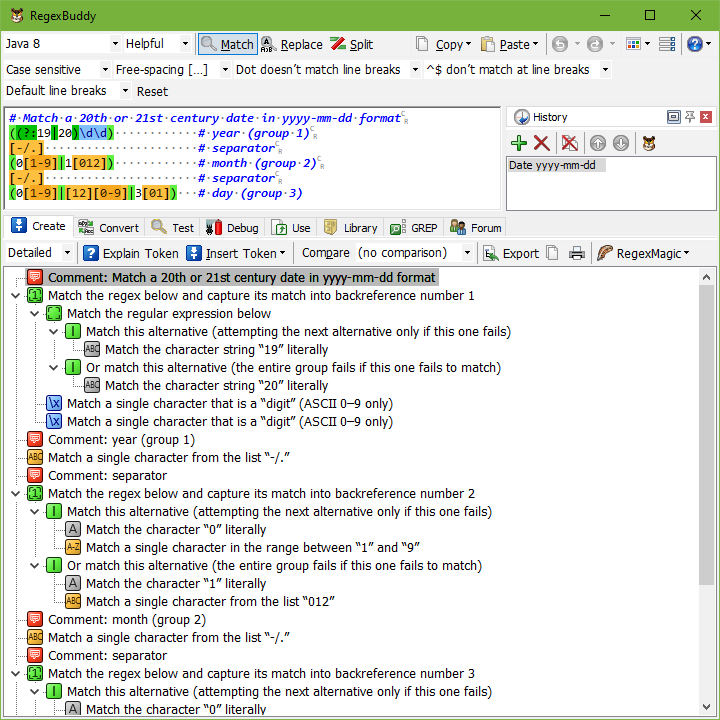
When you enter a regular expression or paste in an existing regex, the Create panel shows you a tree outline of the regular expression, called the “regex tree”. The regex tree describes the regular expression in plain English, using a structure that you can easily navigate.
The small drop-down list at the left hand of the Create toolbar allows you to switch the regex tree between brief and detailed mode. In brief mode, the regex tree tells you the basic purpose of each part of the regular expression. In detailed mode, the regex tree provides additional detail about the current application’s specific interpretation. For example, when \w is explained as matching a word character, brief mode will tell you nothing further, while detailed mode will also tell you which characters the current application treats as word characters. Brief mode makes it easier to grasp the structure of a complex regex by reducing the amount of information thrown at you. Detailed mode gives you a full understanding by explaining many subtle details that you might not be aware of.
Click on a node in the regex tree, and RegexBuddy highlights the corresponding token in the regular expression. While you edit the regular expression, RegexBuddy keeps the regex tree synchronized with the updated regular expression. As you move the text cursor while editing, RegexBuddy highlights the node in the tree that describes the token around or immediately to the left of the text cursor.
To get more information about a particular node, click on the node and then click the Explain Token button. This opens the regex tutorial in RegexBuddy’s help file, right at the page that describes the node you selected. When the regex tree or the edit box for the regex has keyboard focus, you can also press F1 on the keyboard to open the regex tutorial at the page that describes the selected node or the regex token under the cursor.
After clicking on a node, you can press the Delete key on the keyboard to delete it, or the Insert key to insert a regex token. You can rearrange parts of the regular expression by dragging and dropping nodes with the mouse. Note that moving a node this way actually moves the part of the regular expression that the node represents, rather than the node itself. The regex tree is rebuilt after you moved the node. This can have side effects. E.g. if you move a quantifier to the very start of the regular expression, the node turns from a quantifier node into an error node.
You can edit certain nodes by double-clicking on them. If you double-click the node for a character class, for example, then the window for inserting a character class appears. The window shows the elements in the character class that you double-clicked on. When you click OK, the character class is replaced with the edited one.
Not all tokens can be edited by double-clicking. If you double-click on the regex tree node for a dot, for example, nothing happens. The dot simply matches any character and there’s nothing you can edit about it, other than to delete it or replace it with something totally different.
If some of the syntax used in your regular expression is not supported by the application you selected, then the regex tree shows errors that the selected application doesn’t support such and such. If you double-click on the flavor error node, RegexBuddy automatically replaces it with equivalent syntax that is supported by the selected flavor. This way you can manually convert a regex from one flavor to another. If no equivalent syntax is supported, double-clicking the flavor error node does nothing. Automatic conversion of the entire regex is possible on the Convert panel.
RegexBuddy gives you full freedom to edit the regular expression. It does not get into your way by preventing the regular expression from becoming invalid. Instead, RegexBuddy assumes you know what you are doing, and helps you with that by clearly analyzing your regular expression, whatever state it is in.
If your regular expression will be used in multiple applications or multiple versions of the same application or programming language, use the Compare drop-down list on the Create panel. This expands the regex tree to cover multiple applications, allowing you to instantly compare the behavior of a regex across multiple applications without having to run lots of tests.
The regex tree is not only handy to analyze a regular expression while editing it. The regex tree is perfect for explaining to others how a regular expression works. You can include the regex tree in your documentation or teaching materials by clicking the Export button. You can include it in the source code of software you’re developing via the Use panel.
If you put RegexBuddy in Replace mode, then the Create panel is split into two parts. The top part shows the regex tree as usual. The bottom part uses a very similar structure to describe the replacement text in plain English. You can use it to analyze, edit, and compare the replacement text in the same way as you can use the regex tree for the regular expression. The Insert Token menu switches to show replacement text tokens whenever you click on the replacement text tree. The menu switches back to show regex tokens when you click on the regex tree.